Geometry
The geometry is the most complicate part of the tap. TapPro gives all the information needed to develop a high performance tap according to the material class. For example, the thread relief angles, the back tapes, the cutting angles and all needed parameters to be successful. Finish with testing 3 to 6 series in order to find out the adequate geometry. The software gives you all the information to calculate the geometry in less than 5 minutes.
See the calculated geometry with TapPro for a high performance tap M 10.00 mm X 1.50 mm:
- M 10.00 mm X 1.50 mm
- Class53
- High performance Tap
- Stainless steels
- Tolerance 6H
- Th-hole
- Chamfer form B4
Calculation of M 10.00 mm X 1.50 mm geometry

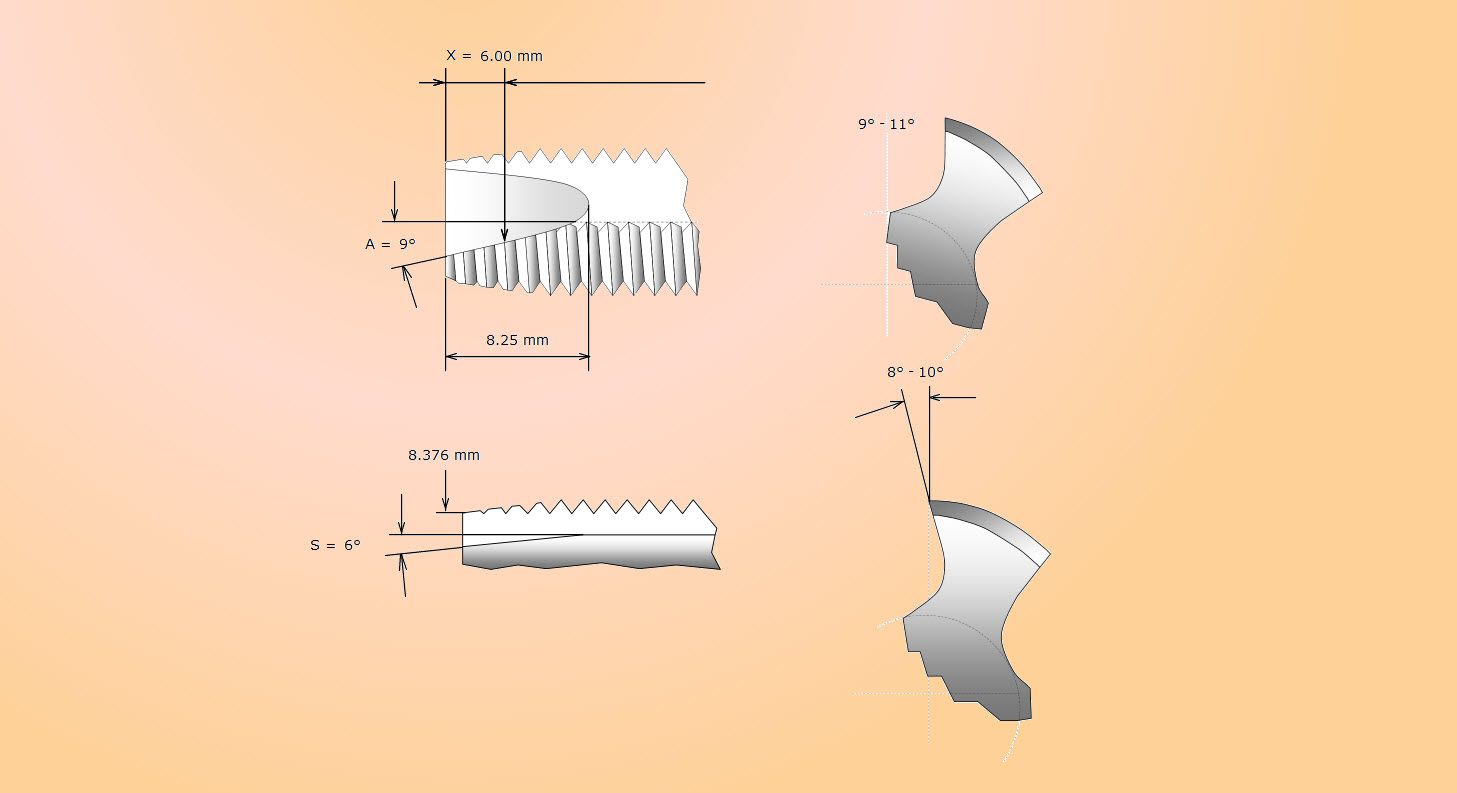
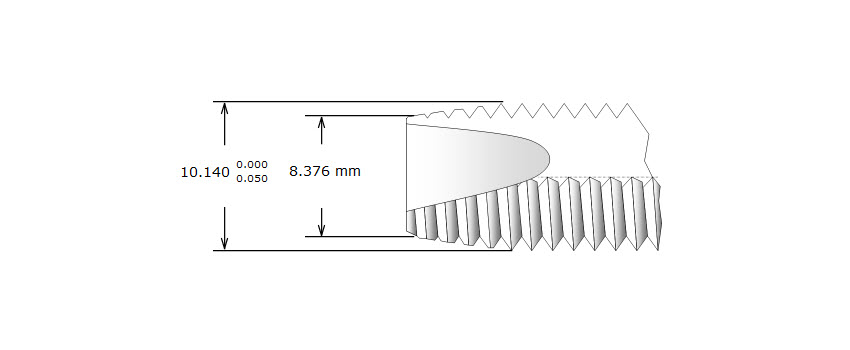
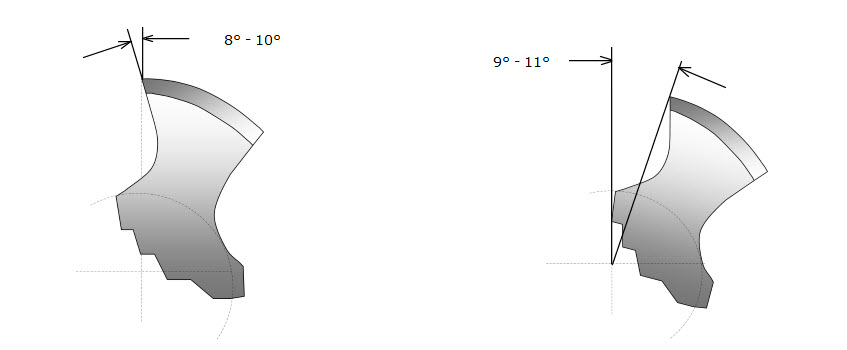
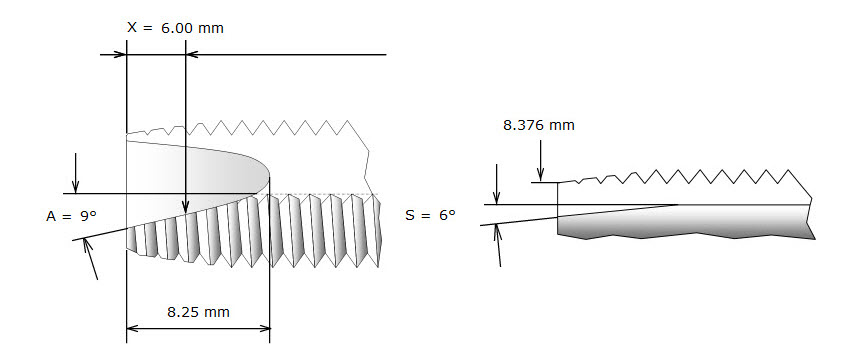
• Spiral point
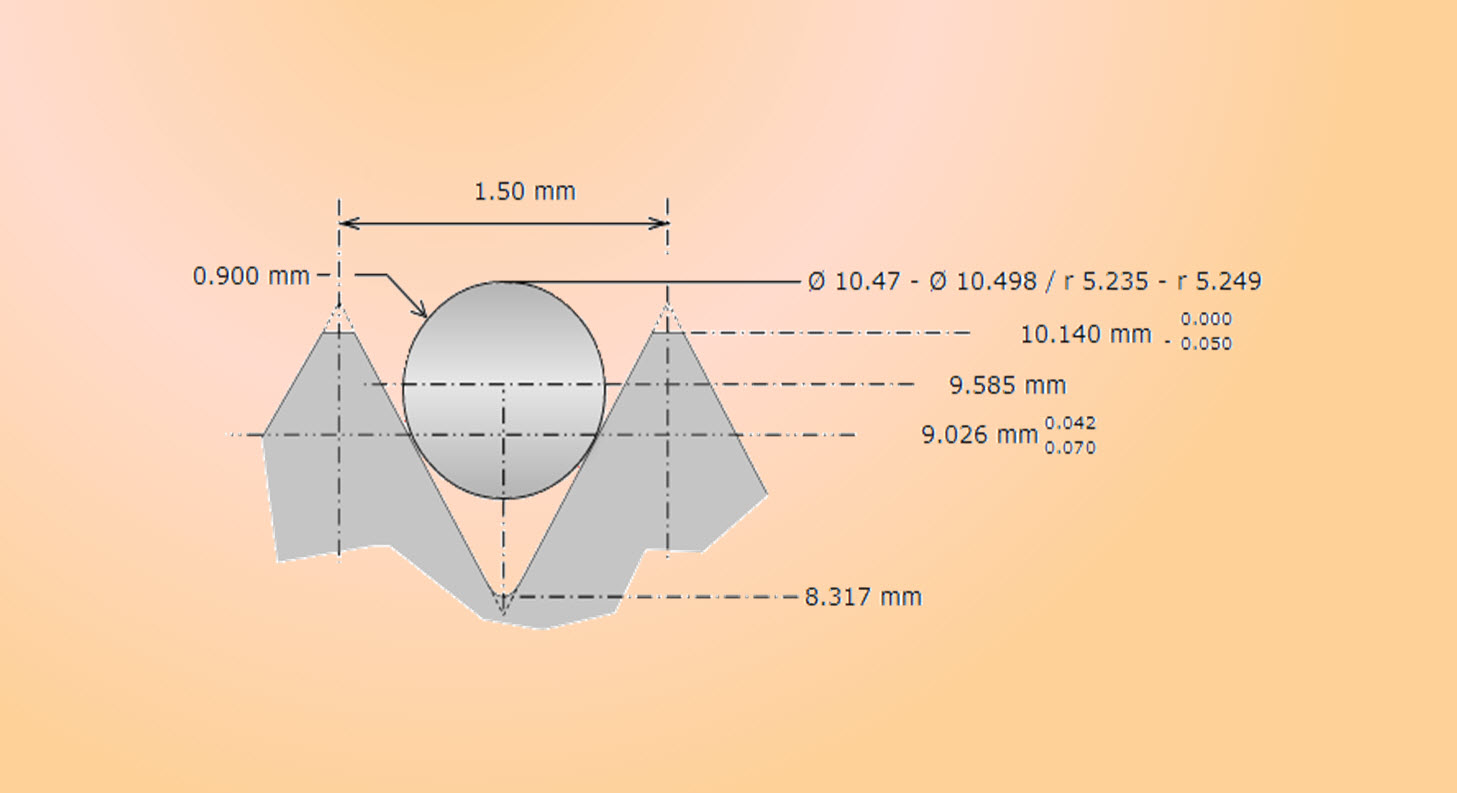
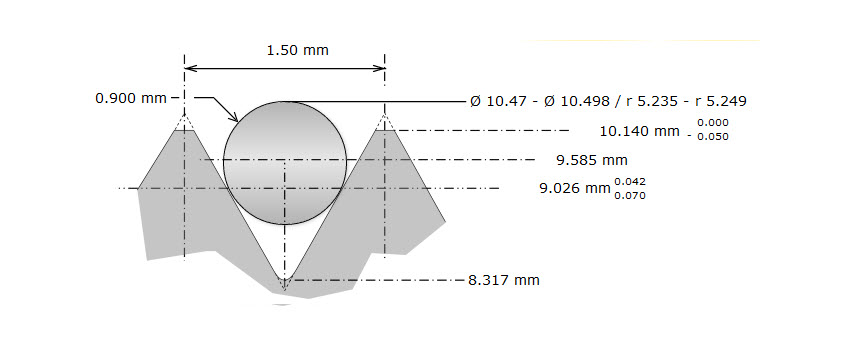
• Thread dimensions
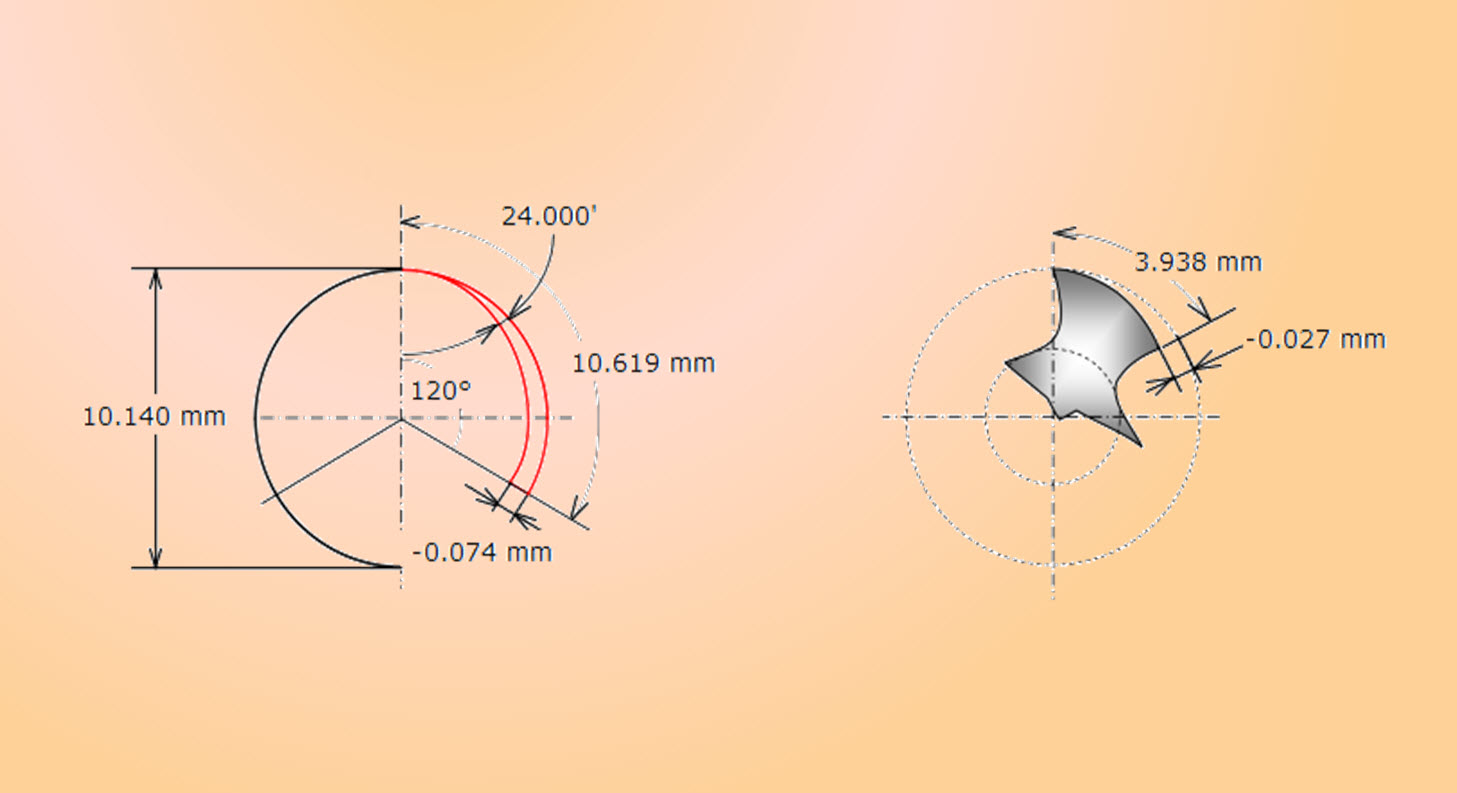
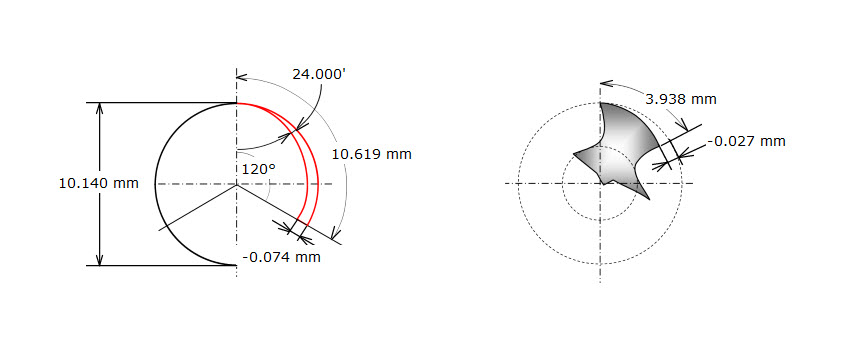
• Division relief in thread
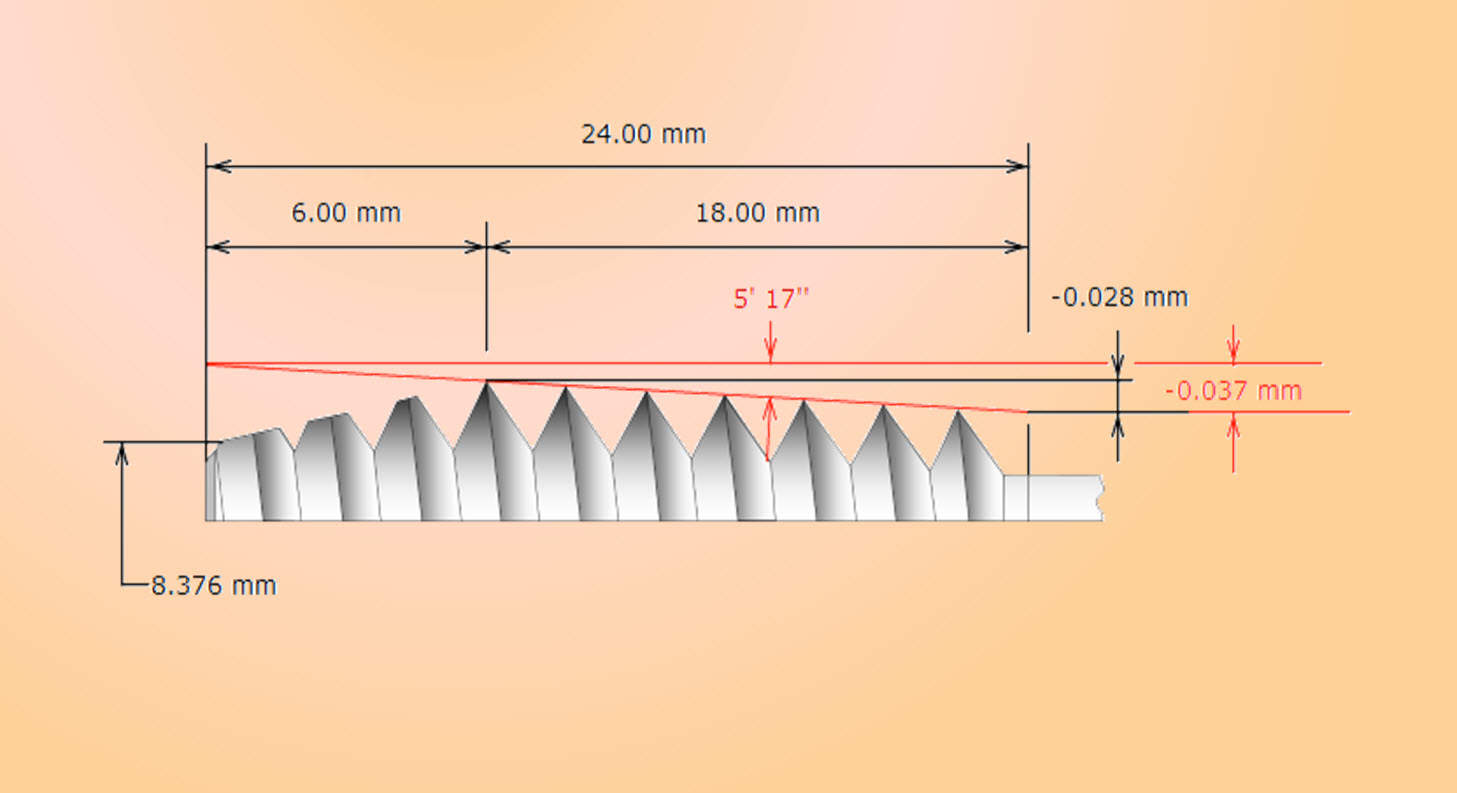
• Back tape
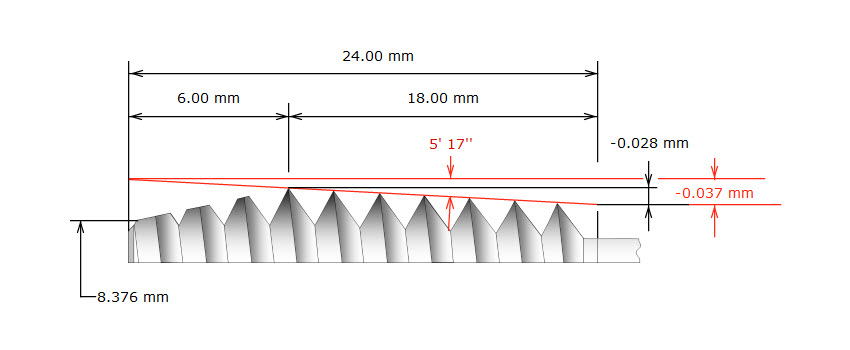
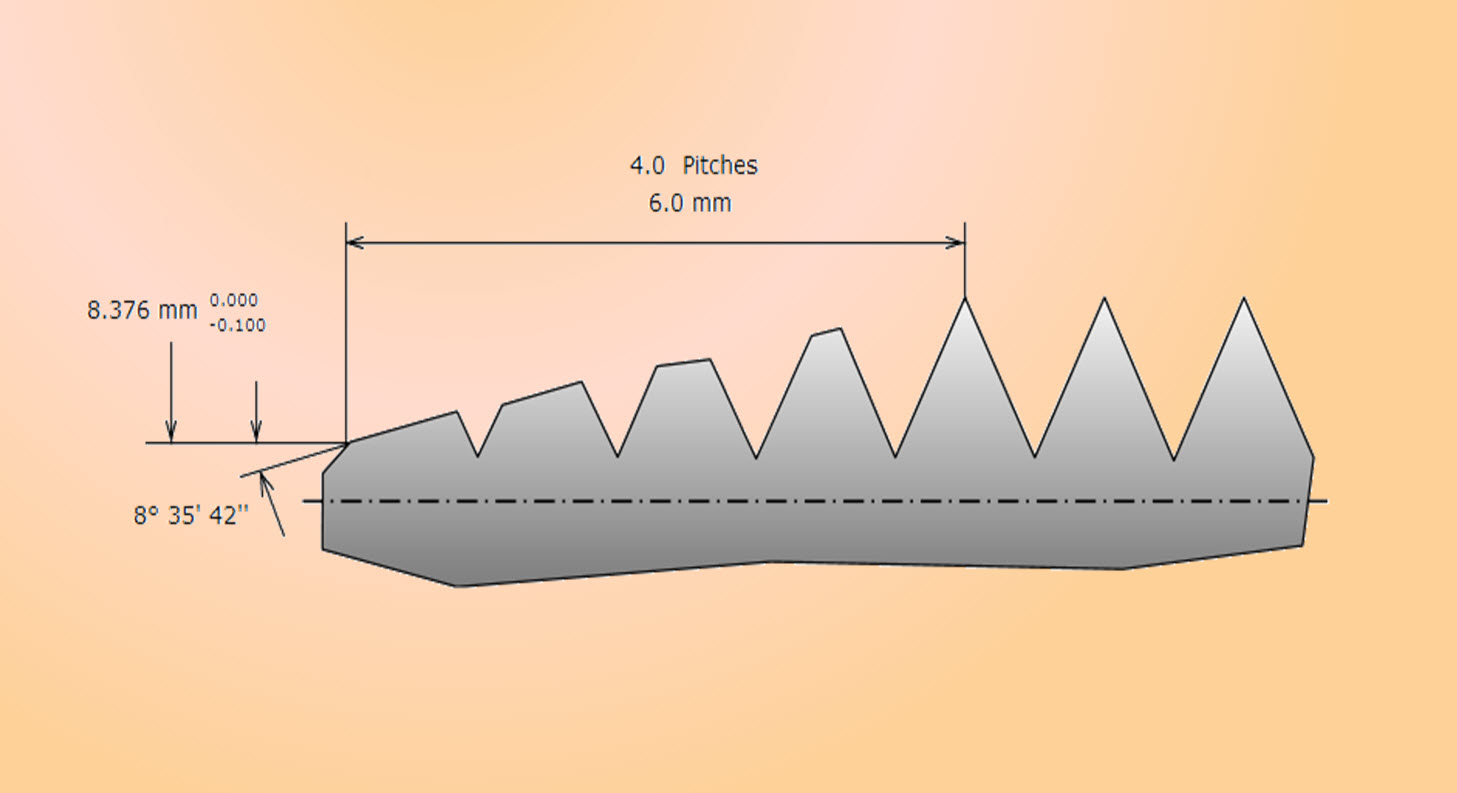
• Chamfer
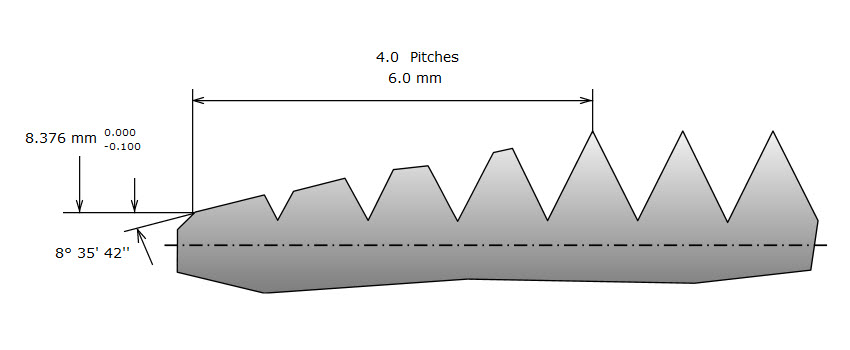
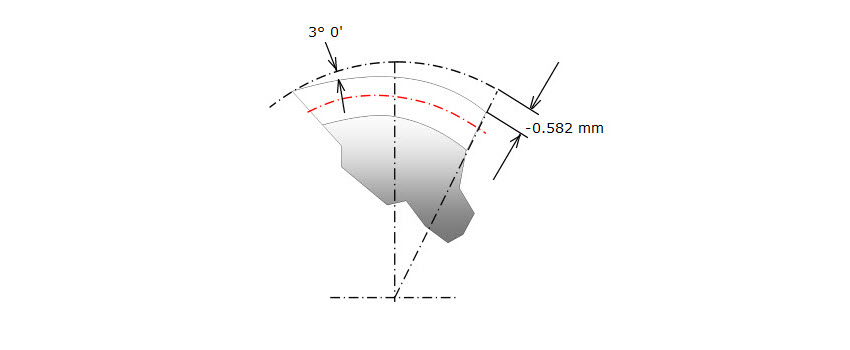
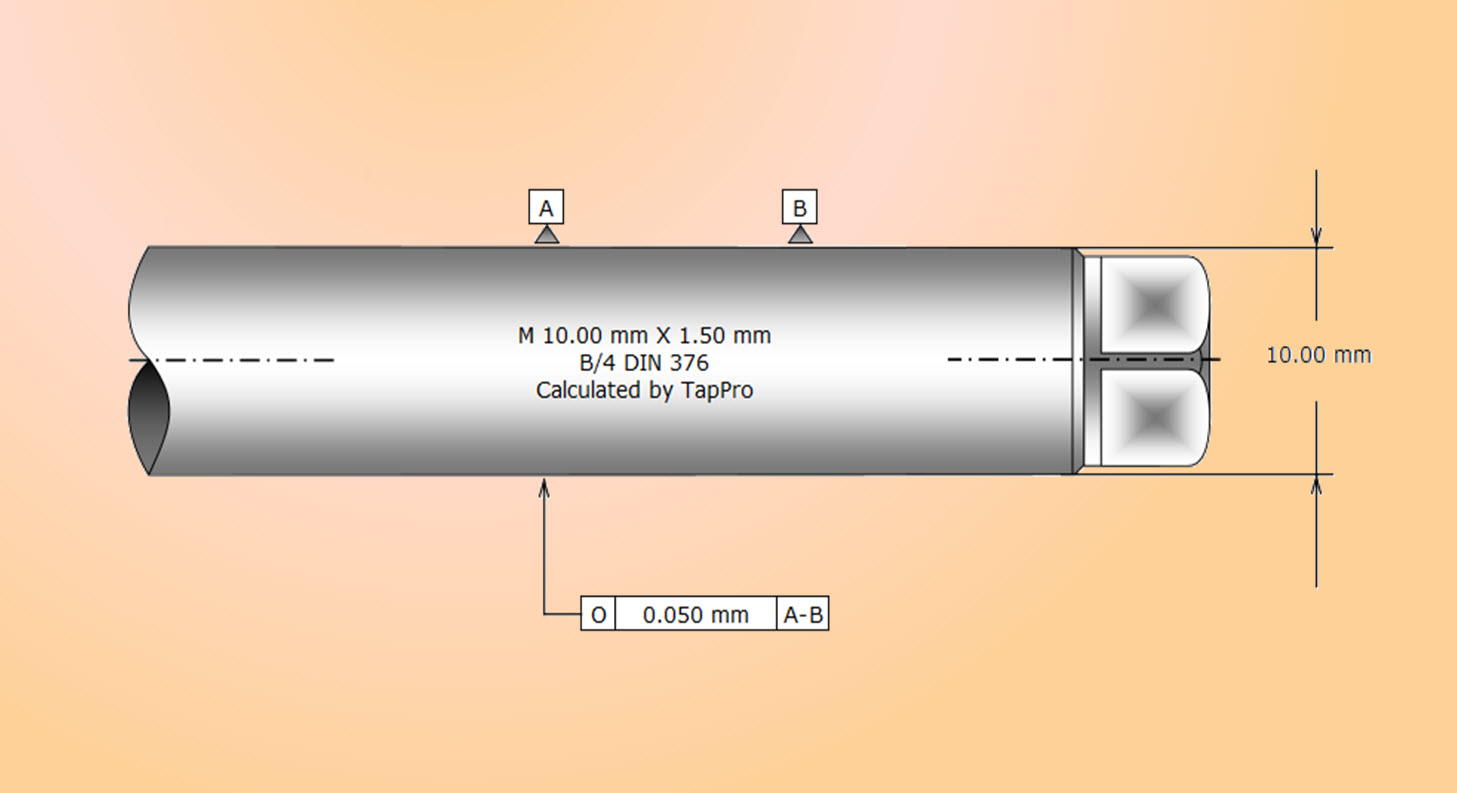
• Shank
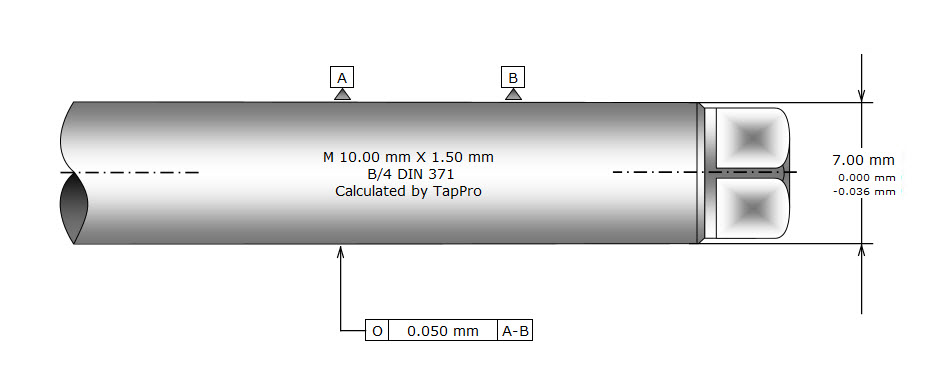
Outside diameter
Chamfer diameter
Spiral point cutting angle min.
max.
Inclination min.
max.
Angle A
Angle S
Spiral point length
Value x
Outside diameter
Upper value
Lower value
TD2 Bolt
TD2 Screw
Flank diameter
Size tolerance 1
Size tolerance 2
Middle flank diameter
Theorical wire diameter
Measuring wire diameter
Measuring wire flank diameter
Measuring wire flank radius
Wire axis
Core diameter
Pitch angle
Half flank angle
Half flank tolerance
Inclined position Cw
Thread bridge width
Thread relif angle
Division
Division relieve in thread
Radians on division
Radians thread bridge width
Relief after thread bridge width
Thread length
Taper angle
Diameter of back tape
Radius of back tape
Chamfer diameter
Tolerance chamfer diameter
Leer
Chamfer length
Leer
Setting angle
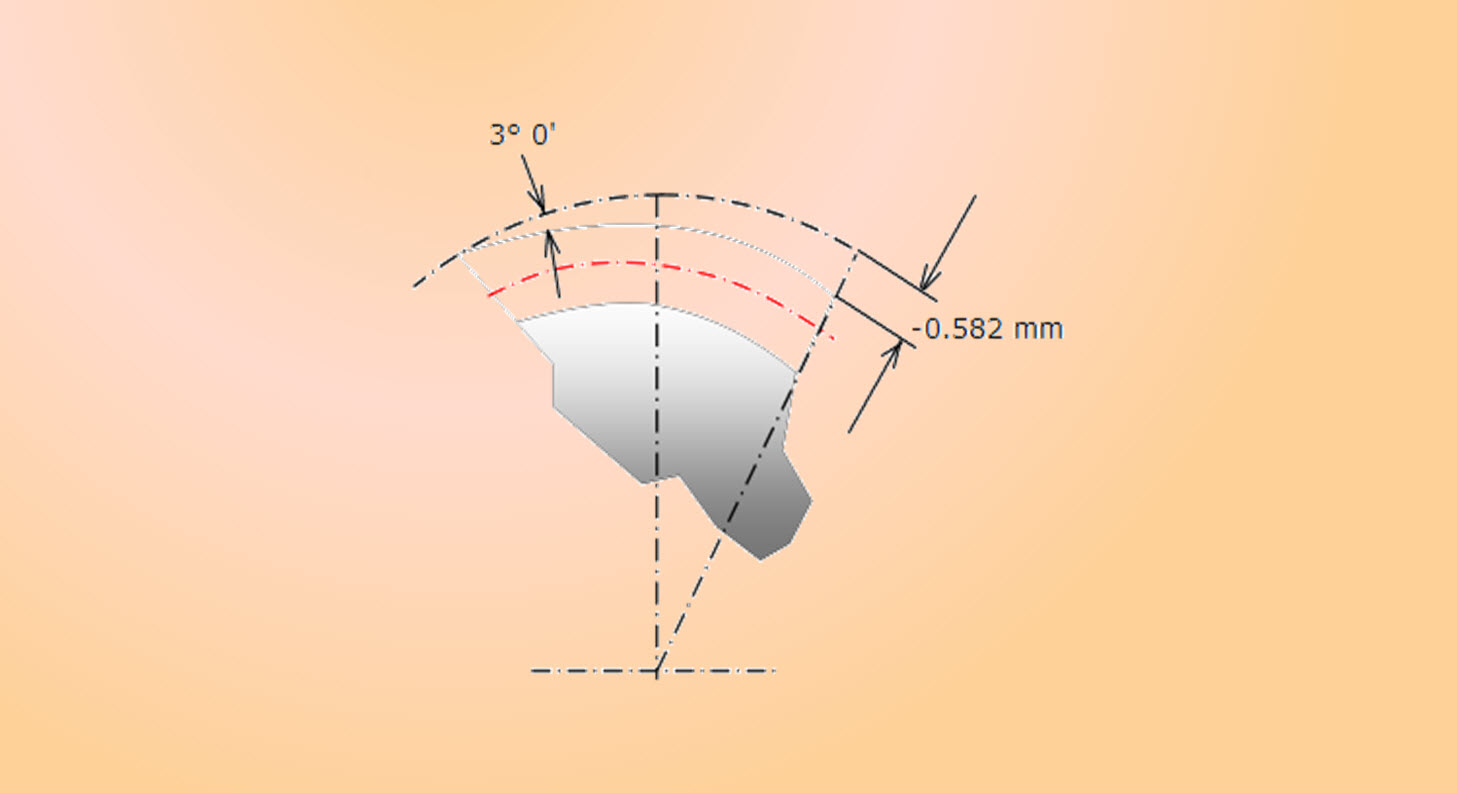
Thread relief angle
Division relief
Marking 1st line
Marking 2nd line
Marking 3rd line
10.140 mm 0.000 / -0.050
8.376 mm
8°
10°
9°
11°
9°
6°
8.25 mm
6.00 mm
10.140 mm 0.000 / -0.050
0.140 mm
0.090 mm
0.140 mm
0.180 mm
9.026 mm
0.042 mm
0.070 mm
9.082 mm
0.866 mm
0.900 mm
10.471 mm min. / 10.499 mm max.
5.235 mm min. / 5.249 mm max.
9.585 mm
8.317 mm max.
3.010° / 3° 0′ 32″
30°
25′
0.0019 mm
3.900 mm
24.000′
120°
-0.074 mm
10.619 mm
3.938 mm
-0.027 mm
24 mm
5.300′
-0.075 mm
-0.037 mm
8.376 mm
0.000 mm
-0.100 mm
4.0 pitches
6.00 mm
8.598° / 8° 35′ 42″
3.00° / 3° 0′ 0″
-0.582 mm
M 10.00 mm X 1.50 mm
B/4 DIN 376
Calculated by TapPro
Information
• All value in blue are proposed by the Genius
• All value in white are calculated by TapPro
• All values in gold are to be entered by the developer
Taps for helicopter
Taps for trucks
Taps for ships
Taps for cars
Information
• All value in blue are proposed by the Genius
• All value in white are calculated by TapPro
• All values in gold are to be entered by the developer
• Overview of the calculation with TapPro
Thread typeXXXXXXXXXXXXX
Designation
Creator
Type
Group number
Artical number
Drawing number
Test protocol number
Date
Time
Thread tolerance
Thread type
Flank angle
Half flank angle
Hole type
Thread diameter
Pitch
Multiple thread
Thread blank diameter
Profile shift «X»
Over mass
Chamfer form
Chamfer pitch
Flute number
Alternated teeth
Right/left
Cutting material
Cutting steel hardness
Hardening process
Class
Genius number
Coating
Coating thickness
Leer
MG-Group
Leer
M 10.00 X 1.50 6H Th-hole
Philippe Manigley
3000
3000 PM Classe53
250.10.15.1
2000.150.10.15.1
2000.150.10.15.2
27.05.2021
10:25:15
6H
M
60°
30°
Th-hole
10.00 mm
1.50 mm
1
10.30 mm
0.000 mm
0.000 mm
B
4
3
No
RH
HSSE-PM
HRc 66
Vaccum
Classe53
1101
TICN
3 μ min.
5 μ max.
MG07, MG09, MG11, MG12
Spiral pointXXXXXXXXXXXXX
Chamfer diameter
Spiral point cutter angle
Leer
Angle A
Angle S
Spiralpoint length
X
Inclinaton
Leer
Leer
ThreadXXXXXXXXXXXXXXXX
Outside diameter
Upper value
Lower value
TD2 Bolt
TD2 Screw
Flank diemeter
Size tolerance 1
Size tolerance 2
Middle flank diameter
Theorical wire diameter
Mesuring wire diameter
Mesuring wire flanc diameter
Mesuring wire flanc radius
Wire axis
Core diameter
Pitch angle
Leer
Leer
Half flank angle
Half flank tolerance
Inclined position Cw
Leer
8.376 mm
8° min.
10° max.
9°
6°
8.25 mm
6.00 mm
9° min.
11° max.
Leer
Leer
10.140 mm 0.000 / -0.050
0.140 mm
0.090 mm
0.140 mm
0.180 mm
9.026 mm
0.042 mm
0.070 mm
9.082 mm
0.866 mm
0.900 mm
10.471 mm min. / 10.499 mm max.
5.235 mm min. / 5.249 mm max.
9.585 mm
8.317 mm max.
3.010° / 3° 0′ 32″
30°
25′
0.0019 mm
Thread bridge width
Thread relif angle
Division
Division relieve in thread
Radians on division
Radians thread bridge width
Relief after thread bridge width
Thread length
Taper angle
Diameter of back tape
Radius of back tape
Leer
ChamferXXXXXXXXXXXXXXX
Chamfer diameter
Tolerance chamfer diameter
Leer
Chamfer length
Leer
Setting angle
Thread relef angle
Division relef
Leer
Leer
ShankXXXXXXXXXXXXXXXXX
Norm
Concetricity thread/shank
Shank diameter
Tolerance class
Shank diameter tolerance
Leer
Leer
DesignationXXXXXXXXXXXXX
Marking 1st line
Marking 2nd line
Marking 3rd line
3.900 mm
24.000′
120°
-0.074 mm
10.619 mm
3.938 mm
-0.027 mm
24 mm
5.300′
-0.075 mm
-0.037 mm
Leer
Leer
8.376 mm
0.000 mm
-0.100 mm
4.0 pitches
6.00 mm
8.598° / 8° 35′ 42″
3.00° / 3° 0′ 0″
-0.582 mm
Leer
Leer
Leer
DIN 376
0.050 mm
7.000 mm
h9
0.000 mm max.
-0.036 mm min.
Leer
Leer
M 10.00 mm X 1.50 mm
B/4 DIN 376
Calculated by TapPro
• Overview of the calculation
Thread type
Designation: M 10.00 X 1.50 6H Th-hole
Creator: Philippe Manigley
Type: 3000
Group number: 3000 PM Classe53
Artical number: 250.10.15.1
Drawing number: 2000.150.10.15.1
Test protocol number: 2000.150.10.15.2
Date: 27.05.2021
Time: 10:25:15
Thread tolerance: 6H
Thread type: M
Flank angle: 60°
Half flank angle: 30°
Hole type: Th-hole
Thread diameter: 10.00 mm
Pitch: 1.50 mm
Multiple thread: 1
Thread blank diameter: 10.30 mm
Profile shift «X»: 0.000 mm
Over mass: 0.000 mm
Chamfer form: B
Chamfer pitch: 4
Flute number: 3
Alternated teeth: No
Right/left: RH
Cutting material: HSSE-PM
Cutting steel hardness: HRc 66
Hardening process: Vaccum
Class: Classe53
Genius number: 1101
Coating: TICN
Coating thickness: 3 μ min. to 5 μ max.
MG-Group: MG07, MG09, MG11, MG12
Spiral point
Chamfer diameter: 8.376 mm
Spiral point cutter angle: 8° min. / 10° max.
Angle A: 9°
Angle S: 6°
Spiralpoint length: 8.25 mm
X: 6.00 mm
Inclinaton: 9° min. / 11° max.
Thread dimensions
Outside diameter: 10.140 mm 0.000 / -0.050
Upper value: 0.140 mm
Lower value: 0.090 mm
TD2 Bolt: 0.140 mm
TD2 Screw: 0.180 mm
Flank diemeter: 9.026 mm
Size tolerance 1: 0.042 mm
Size tolerance 2: 0.070 mm
Middle flank diameter: 9.082 mm
Theorical wire diameter: 0.866 mm
Mesuring wire diameter: 0.900 mm
Mesuring wire flanc diameter: 10.471 mm min.
XXXXXXXXXXXXXXXXXXXXIII10.499 mm max.
Mesuring wire flanc radius: 5.235 mm min.
XXXXXXXXXXXXXXXXXXXI5.249 mm max.
Wire axis: 9.585 mm
Core diameter: 8.317 mm max.
Pitch angle: 3.010° / 3° 0′ 32″
Half flank angle: 30°Leer
Half flank tolerance: 25′
Inclined position Cw: 0.0019 mm
Division relief in thread
Thread bridge width: 3.900 mm
Thread relif angle: 24.000′
Division: 120°
Division relieve in thread: -0.074 mm
Radians on division: 10.619 mm
Radians thread bridge width: 3.938 mm
Relief after thread bridge width: -0.027 mm
Back tape
Thread length: 24 mm
Taper angle: 5.300′
Diameter of back tape: -0.075 mm
Radius of back tape: -0.037 mm
Chamfer
Chamfer diameter: 8.376 mm
Tolerance chamfer diameter: 0.000 mm
XXXXXXXXXXXXXXXXXXXIII-0.100 mm
Chamfer length: 4.0 pitches / 6.00 mm
Setting angle: 8.598° / 8° 35′ 42″
Thread relef angle: 3.00° / 3° 0′ 0″
Division relef: -0.582 mm
Designation
Marking 1st line: M 10.00 mm X 1.50 mm
Marking 2nd line: B/4 DIN 376
Marking 3rd line: Calculated by TapPro
• All value in blue are proposed by the Genius
• All value in white are calculated by TapPro
• All values in gold are to be entered by the developer


